1 Creating an assessment plan
1.1 From the Portfolio Front Page, click the yellow "Plans" tab on the right
1.2 Click 'Add New Plan'
1.3 Complete the fields on the screen, and click 'Save & Close'
1.4 Click 'Submit' then 'OK'
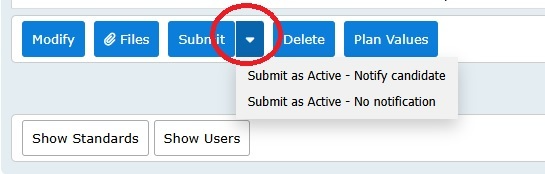
Submit options:
Submit: Notifies candidate and they then need to accept the plan
Submit as Active - Notify Candidate: Moves the plan to active and candidate receives an email containing a link to the plan
Submit as Active - No notification: Moves the plan to active but the candidate does not receive any notification
Note: if you want to create a plan for more than one candidate, or that you can use again and again for different candidates, see WORK TEMPLATES
Your Candidate will now be alerted to the proposed Plan. Once your Candidate clicks 'Accept' at the bottom of the Plan they can then add Evidence.
2.1 Adding Evidence
2.1.1 Go to the Plan (or bottom of the green Evidence tab) and click 'Add Evidence Type'
2.1.2 On the right, using the drop down menu, select the Evidence Type you want to prepare, and enter a short description if required
Optional:
Display Colour: Choose the colour the evidence line will appear as in the evidence tables.
Candidate must provide References: Tick if you require the candidate to complete a authenticity statement when submitting the evidence.
On Activation, make Assessor the Holder: Tick if you do not want the candidate to be able to prepare this evidence.
Allow Evidence to be Linked: Remove the tick if you would like to prevent users from being able to change links to the evidence once it moves from draft.
Allow 'Finish Assessment - Accept not required': Remove the tick if the candidate must accept feedback for this evidence, and cannot be overridden by the assessor.
Additional Guidance Notes : Enter additional guidance, planning, resource hash tags and digital media etc here. This will be displayed on the evidence pages for the candidate to refer to when preparing their evidence.
2.1.3 Click 'Save'
You can now begin preparing the Evidence by using the 'Prepare Written Evidence' button.
Note: When using copy and paste for adding Evidence into Ecordia the user should select 'Paste as Plain Text', this way the system will wrap the text to match your browser rather than keeping the line breaks from the original source.
You can use the 'Link Evidence' button to reference the Evidence to as many units as required.
Once the Evidence has been prepared your Candidate clicks 'Submit Now For Assessment'. The Assessor does not need to click this button if they prepared the Evidence, simply click 'Prepare Assessment Feedback' to give your assessment decision, then 'Finish Assessment' to send your feedback to the Candidate (see step 3.3 below). The Candidate will then be alerted to the feedback, once the Candidate clicks 'Accept' at the bottom of the evidence their progress will be updated.
2.2 Abandon Evidence
Once an item of evidence has been prepared it cannot be deleted, however, you can abandon the evidence if it is not linked to any completed units.
2.2.1 Go to the evidence
2.2.2 Click 'Abandon'
2.2.3 Provide reason, and click 'Abandon Now'
2.2.4 To access abandoned evidence, click on the Evidence tab, and tick the 'Include Abandoned Evidence' check box located in the top left of the evidence table.
3 Assessing Evidence
3.1 Click 'Assess'
3.2 Click 'Link Evidence', select criteria met by Evidence (you can select/move between Units using the tabs at the top). Click 'Finish' once all criteria have been selected. If there are suggested links a suggest links tool will appear at the bottom of the screen. Click on the tool to view mange the suggested links. If you do not manage the links, then they will be automatically included in your linking and will be added to the coverage.
3.3 Click 'Prepare Assessment Feedback', towards the top of the page on the left select 'Assessment Decision', (enter a target date if changes are required to the evidence, and this will update the target presentation date), enter your feedback and click one for the following:
'Finish Assessment' - the candidate will be notified, and on accepting your feedback their progress will be updated.
'Finish Assessment - Accept not required' - if you do not require the candidate to accept your feedback because you've already informed them of the outcome, you can click 'Finish Assessment - Accept not required', this will update the progress immediately.
(if unqualified assessor see Sending Evidence for SLA).
You can return to step 3.2 by clicking 'Modify Assessment', but this button is only available whilst the evidence status is Feedback Given.
Note: If you prepared the evidence, but want the candidate to make changes, tick the 'Make candidate the holder after feedback is accepted:' which can be found on the prepare assessment feedback screen once a negative decision has been selected.

Note: Once you have assessed a piece of Evidence and provided feedback, the progress on the Candidate's Portfolio will not increase/recalculate until the Candidate accepts your feedback. If their email address is in the system they will get an email to notify them of the new task.
Other options available at step 3.2:
'Edit Evidence Properties' - Allows you to change Evidence type and description/title
'Annotate' - Annotate is only available to the assessor when the evidence is being assessed.
It creates a copy of the written evidence for an audit trail of progression. The assessor can also edit the content to highlight or add text. To preserve files, clicks 'files' and click on the pad lock icon. This can lock the file and prevent users from removing the file from the system so you can keep a copy for an audit trail.
This facility is not recommended for Assessor Feedback (see step 3.3 above), and Annotate cannot be used for Written Questioning Evidence Types if there are no questions set.
'Cancel Assessment' - Returns evidence to step 3.1
4 Changing Evidence Type Once Evidence Has Been Assessed
To change the Evidence Type once the evidence has been assessed:
4.1 Go to the Evidence and click 'Assess'
4.2 Click 'Edit Evidence Properties'
4.3 Edit Evidence Type accordingly and click 'Save'
4.4 Click 'Cancel Assessment'
4.5 Go to the Portfolio Front Page and click 'Check Completeness'
4.6 Click 'Check', then return to the Portfolio Front Page and progress should be updated
5 Linking Evidence Once Evidence Has Been Assessed
To link evidence once the evidence has been assessed, without giving feedback again:
5.1 Go to the Evidence and click 'Assess'
5.2 Click 'Link Evidence'
5.3 Select criteria accordingly and click 'Done'
5.4 Click 'Cancel Assessment' (if there is IQA feedback, you will need to complete new assessment feedback which will need to be accepted before proceeding to the next step)
5.5 Go to the Portfolio Front Page and click 'Check Completeness'
5.6 Click 'Check', then return to the Portfolio Front Page and progress should be updated
6 Making a Candidate 'Offline'
If the Candidate does not have access to a computer you will need to make them offline. To do this you will need to go to the Candidate's Portfolio Front Page and click the 'Make Offline' button.
7 Assessor Record
This feature allows assessors and tutors to add written evidence and attachments to the page without becoming the holder of the evidence or changing the evidence status.
The 'Assessor Record' feature can be used at any stage of the workflow process to offer full flexibility in it's use, including updating historical records. An Assessor Record is also included in the evidence if shared to the Blue Tab/EPA evidence.
Was this article helpful?
That’s Great!
Thank you for your feedback
Sorry! We couldn't be helpful
Thank you for your feedback
Feedback sent
We appreciate your effort and will try to fix the article